Instructions For Replacing Parts In A Dell M5040 Laptop
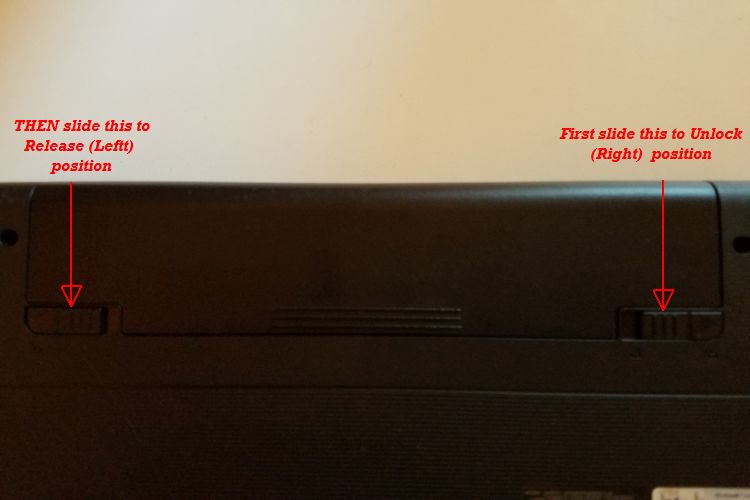
What we'll do here is look into a DELL M5040 laptop and how to replace several parts within. RAM can fail, hard drives can become unstable before they actually fail and just about any internal component may need to be replaced. The first thing to remember when you're going to work inside a laptop is that the should be NO power source connected to it. Replacing parts in any laptop likely means you will be working inside and beyond removing the power input cable the laptop battery must be removed before taking a laptop apart. This remains true even if a particular laptop does not require dismantling to remove, for instance, a hard drive. The point is that there should be no power involved when removing and replacing laptop parts. To that end the slideshow below displays two images regarding removing the Dell M5040 laptop battery. After those images will be several more comprising instructions for replacing parts in a Dell M5040 Laptop.
Removing and Replacing the Dell M5040 Keyboard
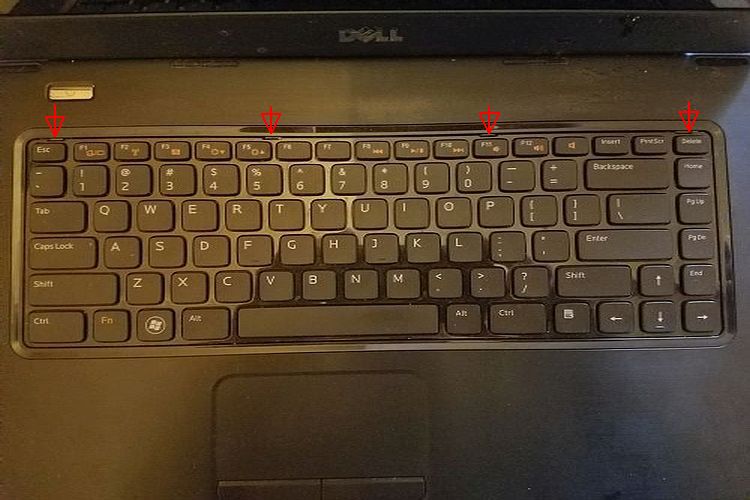
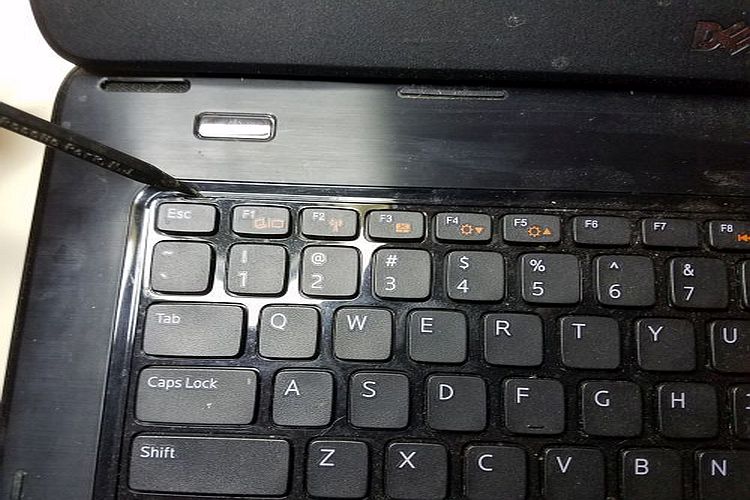
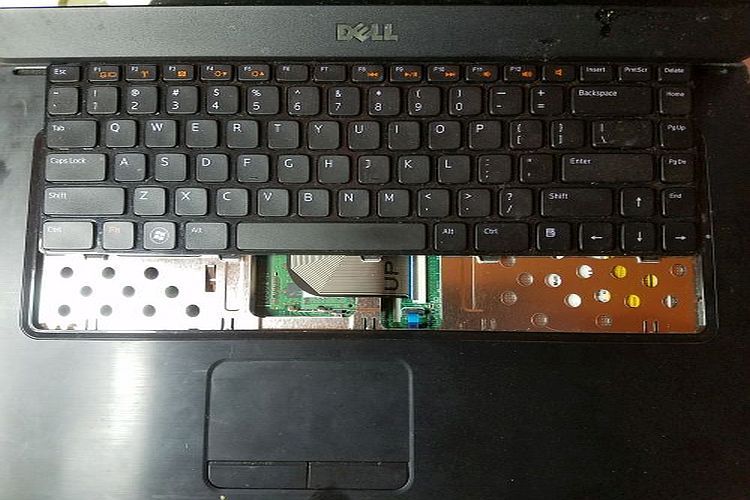
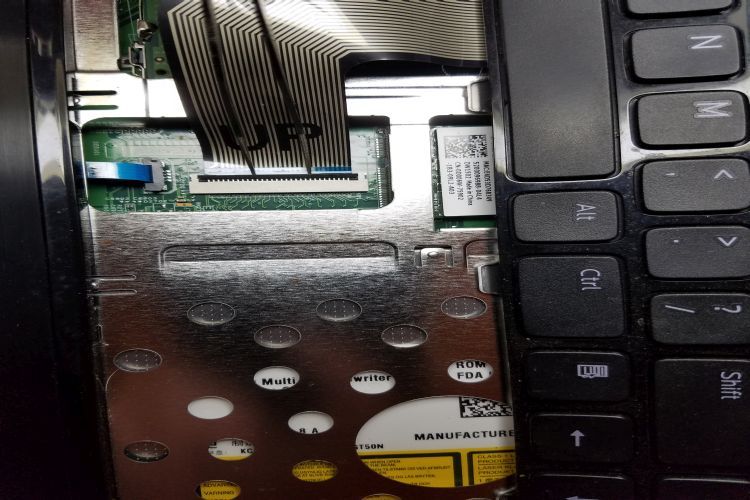
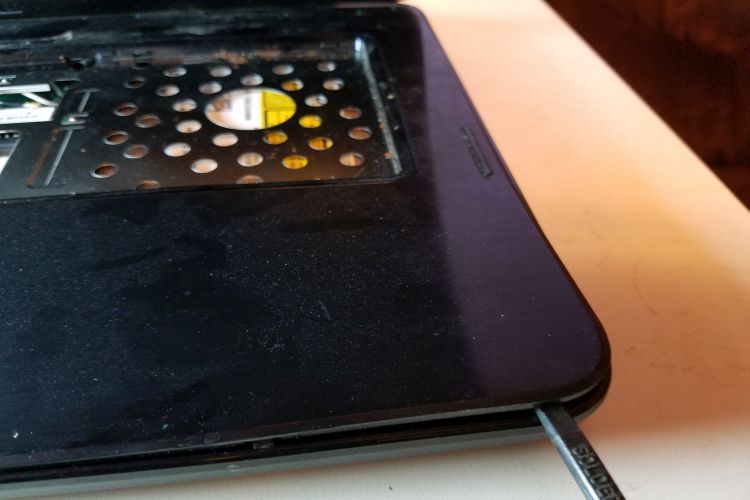
The first thing to remove after the battery is the keyboard, even if you don't need to replace that part. This is because removing any of the parts we're potentially dealing with requires the access provided by removing the Dell M5040 keyboard. You will want to have just a few tools including a plastic or composite scribe, small phillips screwdriver, and a set of preferably curved tweezers. Start by looking at the images in the slideshow below with the first indicating where the four release tabs are located. Each of those should be carefully depressed one at a time and as you proceed the keyboard can be slowly lifted away from the laptop one small section at a time and once the tabs are all released the rest of it can be carefully snapped out and pulled away. Carefully! Once that keyboard is free do NOT move it quickly as the cable must next be released and freed and that involves something known as a ZIF (Zero Insertion Force) connector which can be delicate. USE CAUTION with all ZIF connectors! Once the ZIF connector locking clamp is moved carefully upward the cable will come free. This type of ZIF connector is horizontal where others are vertical and this clamp will turn upward on its hinges. Once the keyboard and cable are fully removed you can see immediate access to several components within the laptop. At this point if all you needed was to replace the keyboard, just reverse the process using your new one (otherwise skip down to the next section and return later). Bear in mind the last image in the slideshow and the tabs at the end of the cable. Those tabs need to be seated well enough inside that horizontal ZIF connector to sit flat and allow the clamp to easily close down on the cable. From there finish reversing the process and you just replaced your keyboard!

Removing and Replacing the Dell M5040 RAM, Wireless Card, and Optical Drive
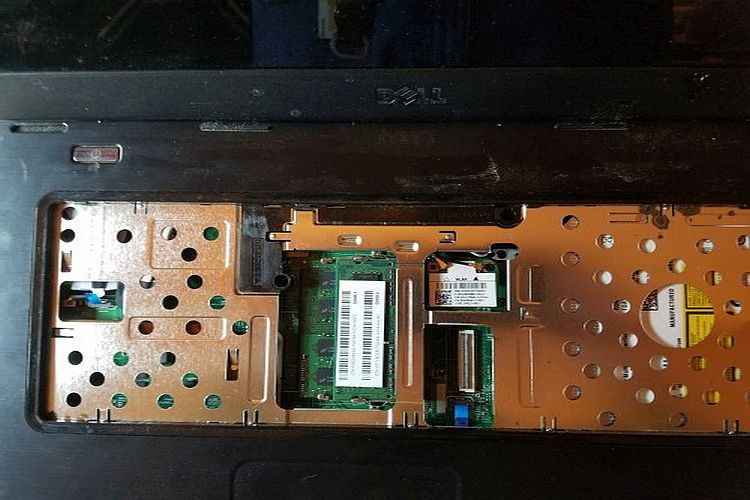
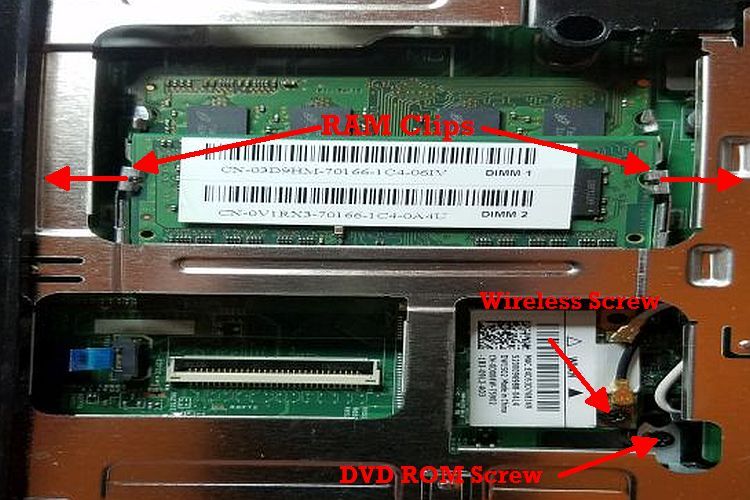
With that keyboard out of the way you can easily access the RAM, wireless card, and CD/DVD ROM (optical drive). The RAM can be removed by carefully moving the two clips each module has retaining them outward away from the RAM - one module at a time. When you do this the module will pop upward at an angle and it can then be pulled out of its socket. If you are troubleshooting a potential RAM failure it's best to remove just one, reinsert that keyboard cable, apply power and boot the system to see if the failure remains. It is always possible that either the top or bottom modules can be at fault and the motherboard is a possibility as well (we'll address that towards the end of this tutorial). Replacing the RAM modules requires inserting at an angle just like when the module was first released and pushing inward as well as down until the clips snap back in place. If you need to change the wireless adapter that is also accessible at this point and only involves two signal connectors and one screw. Those two signal connectors go to the antenna which is deployed up through the display wiring and around the LCD screen. On the wireless card these antenna wire connectors snap onto two studs and these can be removed with a good pair of tweezers or carefully with slim needle nose pliers.Once those are pulled off just the one screw retaining the card can be removed and the wireless adapter can be removed. Replacing the card is just as easy merely reversing the process. Press the new card in place, secure the screw, and snap the two antenna connectors onto the studs. The optical drive is only secured by one screw which is easy to get to and once that is removed, just push outward in the vicinity of that tab or if the tray is open simply pull the device out. Replacing it just takes pushing the new drive in and securing the screw. The image below illustrates RAM clips as well as wireless card and DVD ROM mounting screws.
Removing the Dell M5040 Palmrest to Access Remaining Internal Parts
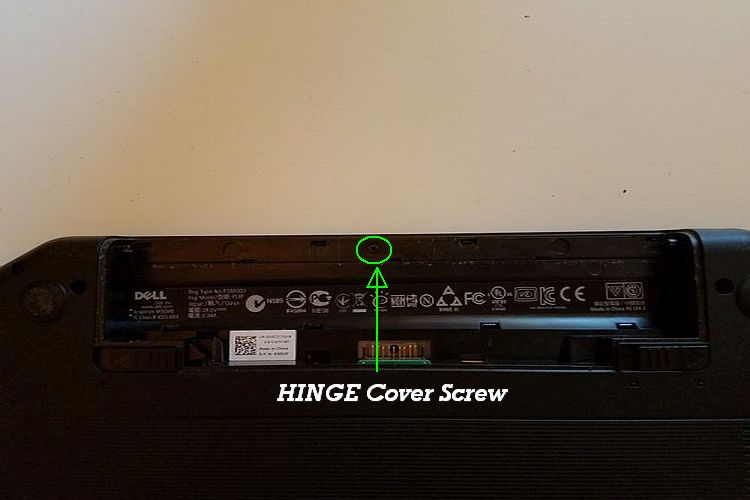
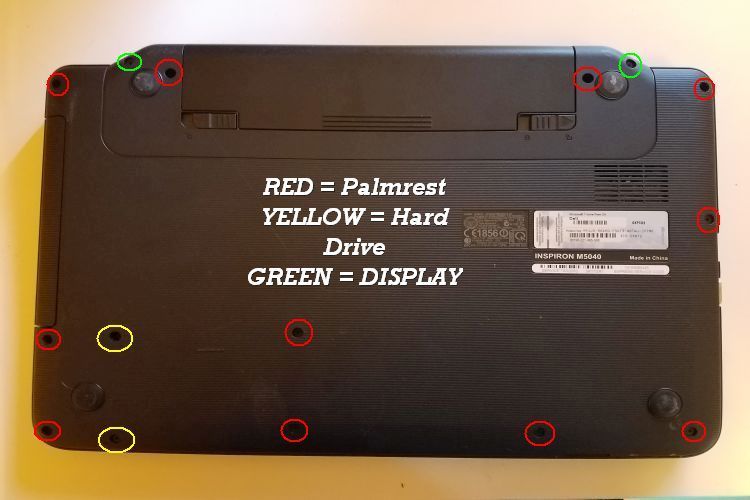
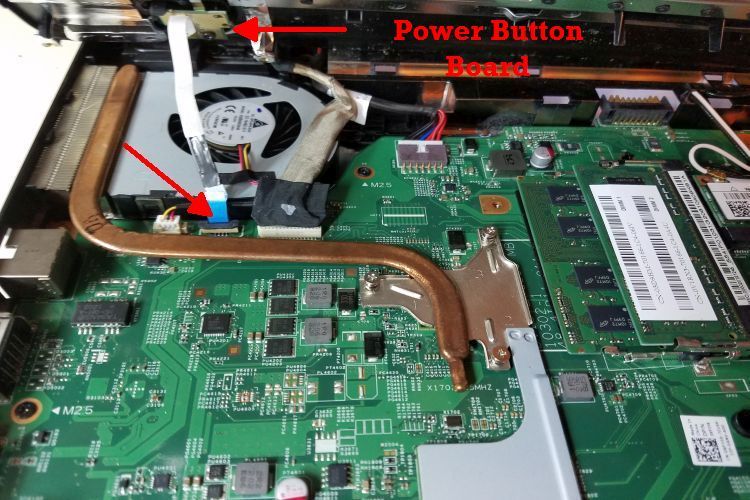
The palmrest is basically the top cover of the laptop base where everything except the lid with the display and the battery resides. To remove that palmrest you have to start at the bottom so close the lid and flip it over. Note the screws identified in the first image below, 11 of which must be removed to then remove the palmrest. Two are just for the hard drive and two more (along with the one pictured before with the battery removed) are for removing the lid containing the display. Start by removing the 11 screws indicated circled in red and then flip the laptop back over upside right. At this point remove the touchpad ZIF cable from the motherboard, pictured in the second image. You might try pulling the vertical ZIF connector locking tab up with tweezers but these are very delicate and pulling up on the blue tab hanging away from the cable is there for just that reason. Then as pictured in the third image below use that scribe or a small screwdriver to push slightly upward from inside where the corner screw you removed was to create separation of the palmrest from the laptop. This is the best way I know to start separating the palmrest. When you push up slide something in the gap (even a fingernail) and pull the scribe out ot the screw hole and insert it into the gap. Now you can carefully lift and work slowly around the perimeter of the palmrest to release all the tabs holding it in place. Don't lift it up much, just enough to release it because there is another ZIF cable to deal with which must be removed from the motherboard before completely removing the palmrest. Looking at the fourth image in the slideshow below note the vertical ZIF connector for the power button. You could use your tweezers and carefully lift the clamp straight up or pull the blue tab. Once that is out the palmrest can be set aside and all remaining internal parts are accessible. With the palmrest out the power button board can be replaced by removing its one screw and pushing the tabs that hold it to release the board, and simply putting a new one in place.

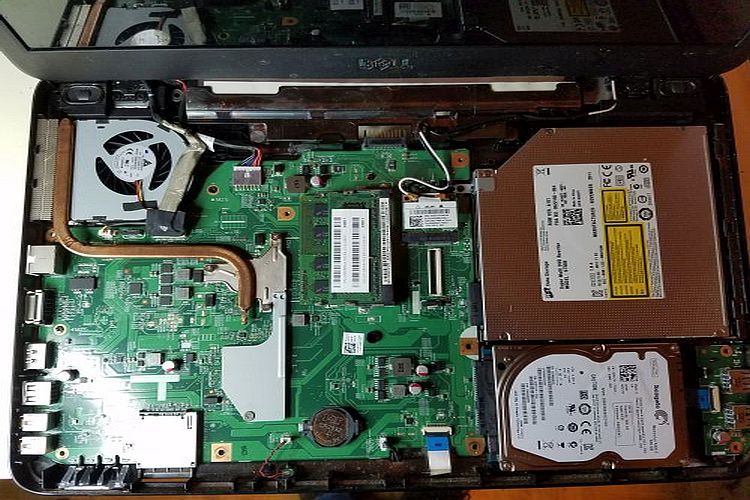
Removing and Replacing the Dell M5040 Hard Drive, Heatsink, and Fan
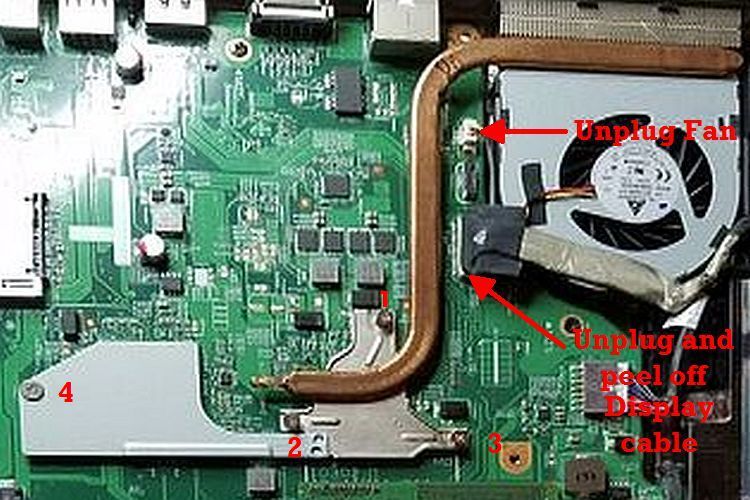
Remember the two screws circled in yellow? If you haven't already, remove those two screws. With the laptop right side up just push the drive to the right until it separates from its motherboard connector and it can be lifted out. Putting a new one back in is exactly that easy as well. The heatsink and fan in this laptop are integrated and should be removed as one unit so please do proceed carefully. First disconnect the display cable from the motherboard and peel it away from the fan (it's secured with 2-way tape) then disconnect the fan's power cable. There are 4 captive screws securing the heatsink to the motherboard and these must be removed sequentially according to their numbering. Once removed the entire heatsink/fan assembly can be lifted up and away from the board. Both chips covered by this heatsink require either thermal pads or thermal grease and when reversing this process to replace the heatsink/fan assembly all applicable surfaces must be cleaned with alcohol and new pads or grease applied.
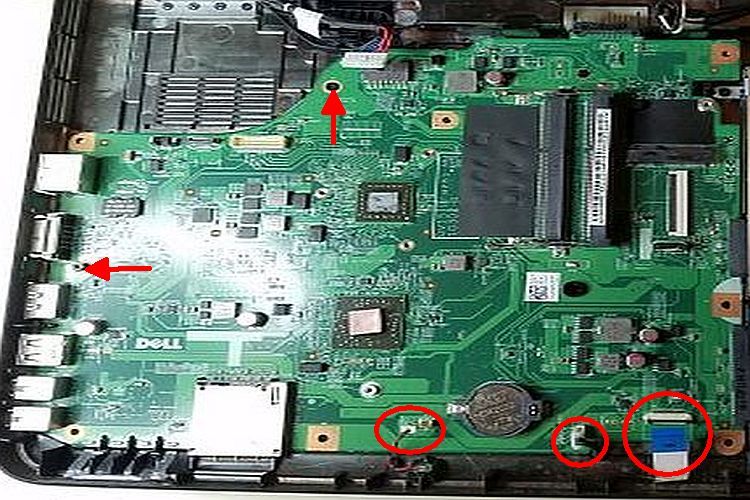
Removing and replacing the Dell M5040 Motherboard
With all of the previously discussed parts removed there are only a few things left to allow the removal/replacement of the motherboard. There are only 2 screws involved and it's just a matter of disconnecting a few cables so that the board can then be lifted out of the laptop base. The power input is near where the fan had been and is shown disconnected in the image below. The speaker and microphone cables as well as one more ZIF cable for the USB board are all that remain to free up that motherboard for removal. The USB board itself can be changed easily with just its ZIF connector and 2 locking tabs to deal with. To remove the motherboard with all things disconnected, just push slightly from the outside left and move it up on the right side. Replacing the motherboard is just that easy reversing the process, installing the 2 screws, and then reconnecting all that was removed. Refer back to earlier in this article to double check replacing each part that was removed and reassemble the Dell M5040!